
One of the most frustrating parts of getting started with Python for web development is exactly that: getting started.
OK, so maybe installing Python isn't that big of a deal. The OS-specific installers have always worked flawlessly for me.
However, widely accepted best practices include:
-
Use virtualenv to keep your Python environments separated
-
Use pip to install packages to these environments
This, the addition of virtualenv + pip, is usually the point where beginners run in to problems.
Paths, libs, easy_install, pip, setup.py, people in forums trying to help others by asking "whats in your sys.path" and other confusing bits from Google searches can make this whole process frustrating.
What's The Problem, Exactly?
After reading a handful of online tutorials, most beginners will discover that before they get going with Django/Flask/whatever, they should start with pip and virtualenv.
So! He or she follows the first instruction on the virtualenv pypi page, which looks like this
> [sudo] pip install virtualenv
Right. Let's use pip to install virtualenv on our machine.
This command fails, because they don't have pip.
So they Google, "where to get pip" and someone on a forum helpfully points out that it comes with virtualenv and why aren't you using virtualenv?? (grumble, grumble, I'm trying!)
"Wait, I need pip to get virtualenv...but I need virtualenv to get pip?"
After some more Googling, turns out you can use easy_install to bootstrap this whole process.
Great!
Have you seen the easy_install installation script?
Do you know what it does?
Here it is: https://bitbucket.org/pypa/setuptools/raw/bootstrap/ez_setup.py
The easy_install page on pypi provides Windows users the above link for installation and explains that it will download the appropriate .egg files. Then you have to add the Scripts directory to your PATH environment variable and maybe a few more steps.
It's Not Difficult, But Intimidating. That's The Problem
The process of bootstrapping pip/virtualenv, or starting with easy_install, or whatever suggest path, is often confusing, leaves plenty of room for error or omission and can make the process seem unnecessarily difficult.
One minute you're amped up to spend your Sunday learning Django. The next minute, you're too frustrated to care. You couldn't even get to Step 1 of the Django tutorial.
Grumpy developers will dismiss any arguments that configuring your PATH environment or working with .eggs is difficult in any way, and programmers need to learn how to debug things like this, and this is how the world works.
Some grumpy developers will dismiss the notion of using Windows in the first place.
I'm not sure what the point of these dismissals are: I think it's to make the developer appear smarter than the frustrated beginners they're heckling (instead of helping)
Anyway, whether or not the actual execution involved is difficult for you or for me or whomever, it's the appearance of these steps that seems difficult. You see .eggs and ez_setup.py files and instructions on editing your PATH environment variable and it doesn't look like fun.
You wanted to learn Django today, not learn what .egg files are.
Solution: Use Locally From Source
This is a screenshot from the Virtualenv website:

Folks must miss this all the time, or at least don't firmly grasp what exactly is being demonstrated in the sample commands that are listed, because I constantly read forum questions where people are struggling to get virtualenv working in Windows (hence I'm writing this post).
That's certainly not a knock on the virtualenv team whatsoever. I just feel this approach should be more heavily promoted in the Python community.
Step 0: Install Python 2.7
If you haven't already.
By default, this should give you a C:\Python27 directory on your hard drive.
It's OK if you changed the destination path, just as long as you know exactly where your Python executable lives (and you don't confuse it with any other Python versions)
Make sure you reboot your PC after installing. Yes, you have to. Bookmark this page.
Step 1: Download Virtualenv With A Web Browser
You don't have to do any of the easy_install-to-get-pip-to-get-virtualenv dances that I've seen floating around the interwebs.
We won't use any packaging tools here. Using a web browser, download the latest version of virtualenv.
As of this minute, this is your URL to get virtualenv version 1.10.1:
https://pypi.python.org/packages/source/v/virtualenv/virtualenv-1.10.1.tar.gz
Download that to your hard drive, extract it and extract it again (this is an archive inside an archive situation here, last time I downloaded it).
Eventually you'll end up with a folder called virtualenv-1.10.1 that has all the files inside. You'll know you're there when you see AUTHORS.txt, for example.
Take this virtualenv-1.10.1 folder and move it someplace incredibly handy. I don't go crazy with hierarchies for things this important, so mine lives right in the root of C:\
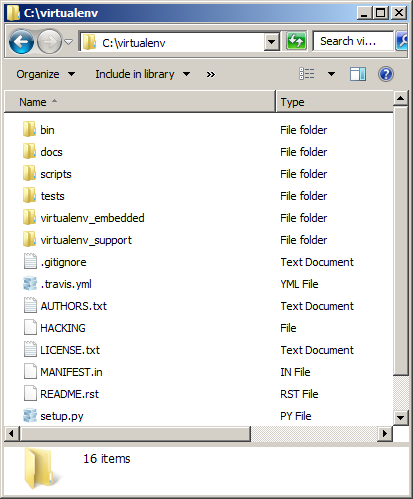
As you can see, I renamed mine to take out the version number bits just for cosmetic reasons. You don't have to.
That's It! Virtualenv Where And When You Need It
When you want to create a new virtualenv, you need to execute the commands in this fashion
> [python.exe] [virtualenv.py] [destination]
Now, my approach intentionally leaves out editing your system PATH, or using a bootstrapping script to append to your sys.path for you, or anything like that. The cost of this workaround is minor: just use absolute paths!
So for this setup, you would run this command
> c:/Python27/python.exe c:/virtualenv/virtualenv.py c:/projects/new_env
..and to follow through with activation...
> cd new_env/Scripts
> activate
> pip install Django
Virtualenv has everything it needs tucked inside that C:\virtualenv directory
You don't need to change anything. Sure, you can save some keystrokes by adding various folders to your PATH environment variable, but here's two reasons why I don't go that route:
-
I've never felt like "this is too much typing, I gotta add these directories to my PATH".
-
I like the explicits of this approach. If I want to install Python 2.6 or 3.3 or do side-by-side virtualenvs from source, I can. This approach means I'm expliciently calling the Python installation I want to use (this one here, in C:\Python27) and I'm explicitness calling the virtualenv source I want to use (this one, in C:\virtualenv) and there is never any confusion.